About
Disclaimer: The process is slightly different for each device. Since each device is a different make/model, the graphical user interface is a bit different for each device. The information outlined below should be used as a guideline, and not necessarily a step-by-step procedure.
A scanner allows you to scan in old photos or other documents to make them digital. Scanning is simple, and once you make files digital, you can e-mail them or share them with others in a variety of ways. Just place whatever you’d like to scan on your scanner’s bed, and let the scanner do the rest.
Steps
- Choose Start→All Programs→Accessories→Scanner
After you place a page, a picture, or some other object in your scanner, Windows begins scanning your item when you follow this path. If you have more than one device, you get a Select Device dialog box where you choose which one you want to use. Select one and then click OK. Then you see the opening window of the Scanner click Next. You now see the dialog box that is described in the next step.
- Choose your preferences for scanning and select Next.
On the second wizard screen that appears, you choose Color Picture, Gray scale Picture, Black and White Picture or Text, or Custom.

- Designate information about the file and then click Next.
In the resulting scanner window, you designate a name or select a group that you’ve already created (in the first drop-down list), a format for the file, such as .bmp or .jpg (in the second drop-down list), and a location to store the file (in the third drop-down list).
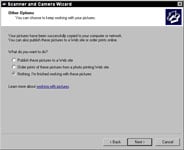
- Choose one of options to finish.
When the scanning is complete, you can publish these documents to a Web site, or choose Nothing if you’re finished working with these documents. Note that if you choose Nothing, you get the final window confirming you scanned one item and click Finish. After clicking Finish, you are taken to your browser, where the file you scanned is highlighted and ready to double-click and edit or view.